Showing posts with label datawrangler. Show all posts

Postgres: Optimization & Beyond


Postgres, one of the widely used Relational Database Management System; has been widely adopted due to its ability to handle different workloads such as web services, warehouses, etc.
Fun Fact: The name Postgres comes from it's predecessor originated from UC Berkley's Ingres Database (INteractive GRaphics iterchangE System; meaning it's Post-INGRES).
There are times when the performance is straight forward and in other cases when the expected performance is not met; the Database requires some tweaking in the form of structural modifications to the table, Query Tuning, Configuration improvements, etc.

This article will provide some useful pointers and action plans to become a power-user in optimizing Postgres.

What to do when a query is slow?


In most cases, the occurrence of a slow query is due to the absence of indexes, for those fields that are being used in the where clause of the query.

That should have solved the problem, right? RIGHT?

You:


I hear you; Life ain't Fair, or Is it?

Not all Indexes for the fields in the WHERE clause can be helpful; It all depends on the appropriate query plan prepared by the optimizer: Prepend `EXPLAIN ANALYZE` to the query and run it to find the query plan.

Pro Tip: Use https://explain.depesz.com/ to visualize and analyze your query plan. The color formatting gives a straight forward output to debug the reason for the slowness.

The query plan itself can provide a whole lot of information about where the resources are overflowing. Given below, are a few of those keywords that you can find in the query plan and what they mean to you and the query performance.

Sequential Scan:

Yes, you read that right. The scan occurs sequentially; the filter runs for the whole table and returns back the rows that match the condition which can be very expensive and exhaustive. In the case of a single page / small table, Sequential scans are pretty fast.

But for larger tables; To speed up the query, the sequential scan needs to be changed to an Index Scan. This can be done by creating indexes on the columns that are present in the where clause.

Index Scans / Index Only Scans:

Index Scans denote that the indexes are being properly used. Just make sure that the analyzing & vacuuming happens once in a while. This keeps all the dead tuples out of the way and allows the optimizer to choose the right index for the scan.

Bitmap Index Scan:

And this right here is the bummer. Bitmap Index Scans are accompanied by Bitmap Heap Scans on top. These scans occur mostly happen when one tries to retrieve multiple rows but not all, based on multiple multiple logical conditions in the where clause.

It basically creates a bitmap out of the pages of the table, based on the condition provided (hence the Bitmap Heap Scan on top). The query can be sped up by creating a composite index A.K.A multicolumn index; which changes this scan to an Index Scan.

Caution: The order of the columns in the composite index needs to be maintained the same order as that of the where clause. 

Summarizing:

Indexes are good; Unused Indexes are Bad;
Having Too many Indexes is OK, as long as they are being used at some point.

More RAM for the DB is Good.

The VACUUM & ANALYZE of the tables is too good!!!
ARCHIVAL of Old Data --> Being a good citizen and you are awesome!!


Optimal Settings for a Postgres Engine:

For optimal performance, the following settings (requires a restart of the server) need to be made to the Postgresql conf file present in: `/etc/postgresql/10/main/postgresl.conf`

shared Buffer - 75% of RAM
work_mem - 25% of RAM
maintenance_mem - Min: 256MB; Max:512MB

Consider the scenario, where Postgres Server's has 160Gigs of RAM:

shared_buffer: 120GB
work_mem: 40GB
maintenance_mem: 256MB

Steps to Optimize a query:

1) Run Explain Analyze on your Query, and if takes too long; Run Explain on your Query.

2) Copy the output and paste it onto the dialogue box @ https://explain.depesz.com/

3) Check the Stats of your query:

Index Scans / Index Only Scans are the best and no changes need to be made.

Sequential Scans can be converted into Index Scans by creating the index for the particular column in the where clause.

Bitmap Heap Scans can be converted into Index Scans by creating composite indexes A.K.A multicolumn indexes, with the same order as that of the where clause, as:

CREATE INDEX $indexName ON $tableName ($Field1, $Field2);

Note to Self: Index & Optimize.!!


Elasticsearch to MongoDB Migration - MongoES

The following are some of the instances where the developers simply love to hate!
  • The one-last-thing syndrome - This reminds me of the following quote:
  The first 90 percent of the code accounts for the first 90 percent of the development time. The remaining 10 percent of the code accounts for the other 90 percent of the development time.
Tom Cargill, Bell Labs, from the book `Programming Pearls `
  • QAs declaring certain undocumented features to be as bugs - Seriously, this create traumas for a devloper.
  • Interruptions during coding - Here's an idea. Try talking to developers while they code; chances are, they have just about <10% of your attention. 
There are some problems which we get used to..

But, there are others which makes us wanna do this..


  • DISCONNECTION FROM THE SERVER DUE TO BAD INTERNET DURING A MIGRATION - Ouch!! That's gotta hurt real bad.

Talking about ES to MongoDB Migration 

- How hard could that be?

Good Side:
JSON objects are common for both.
Numerous tools to choose from, for migration.
Bad Side: 
The Migration can be hideous, and can eat up a lot of the system resources. Be ready for a system-freeze, in case the migration tool uses a queue.
Ugly Side:
Can never be resumed from the point of failure. If the connectivity goes down during the migration; the transferred collection has to be deleted and the data transfer has to be initiated once again from the beginning.


Alright, there's nothing there to be felt bad about.

Enter, MongoES.


MongoES is a pure python3-bred Migration tool to migrate documents from the elasticsearch's index to the MongoDB collections.

It's robust in it's native way; no queues/message brokers are involved; which means that there won't be any memory spikes or system freezes.

This became achievable due to the fact that MongoES specifically uses a tagging strategy prior to the migration. The tagging happens in the source elasticsearch, which stands as a checkpoint during the migration.

Why a new custom id tagging, while there's an _id already?

Unless the documents are explicitly tagged, the _id fields in elasticsearch documents are a bunch of alphanumeric strings generated to serialize the documents. These _id columns become unusable, since queries/aggregations can not be run using them.

MongoES - How to:
  1. Install all the Prerequisites.
  2. Clone the repository from https://github.com/datawrangl3r/mongoes.git
  3. Edit the mongoes.json file according to your requirements.

  4. Make sure that both the elasticsearch and mongoDB services are up and running, and fire up the migration by keying in:

  5. Sit back and relax; for we got you covered! The migration's default value is 1000 documents per transfer.
Happy Wrangling!!! :)

ES Index - S3 Snapshot & Restoration:

The question is. What brings you here? Fed up with all the searches on how to back-up and restore specific indices? 

Fear not, for your search quest ends here.!

After going through dozens of tiny gists and manual pages, here it is. We've done all the heavy lifting for you.


The following tutorial was tested on elasticsearch V5.4.0

And before we proceed, remember:

Do's:

Make sure that the elasticsearch version of the backed-up cluster/node <= Restoring Cluster's version.

Dont's:

Unless it's highly necessary;

        curl -X DELETE 'http://localhost:9200/nameOfTheIndex

              - deletes a specific index

Especially not, when you are drunk!:

        curl -X DELETE 'http://localhost:9200/_all

              - deletes all indexes (This is where the drunk part comes in..!!)


Step1: Install S3 plugin Support:

        sudo bin/elasticsearch-plugin install repository-s3
                                  (or)
        sudo /usr/share/elasticsearch/bin/elasticsearch-plugin install repository-s3

Depends on where your elasticsearch-plugin executable is installed. This enables the elasticsearch instance to communicate with the AWS S3 buckets.

Step2: Input the Snapshot registration settings:

METHOD: PUT

URL: http://localhost:9200/_snapshot/logs_backup?verify=false&pretty

PAYLOAD:
                {
                  "type": "s3",
                  "settings": {
                    "bucket": "WWWWWW",
                    "region": "us-east-1",
                    "access_key": "XXXXXX",
                    "secret_key": "YYYYYY"
                  }
                }


In the URL:
       - logs_backup: Name of the snapshot file

In the payload JSON:
        - bucket: "WWWWW" is where you enter the name of the bucket.
        - access_key & secret_key: The values "XXXXXX" and "YYYYYY" is where we key in the access key and secret key for the buckets based on the IAM policies - If you need any help to find it, here's a link which should guide you through (https://aws.amazon.com/blogs/security/wheres-my-secret-access-key/).
        - region: the region where the bucket is hosted (choose any from http://docs.aws.amazon.com/general/latest/gr/rande.html).

This should give a response as '{"acknowledged": "true"}'.

Step3: Cloud-Sync - list all Snapshots:

METHOD: GET 

URL: http://localhost:9200/_cat/snapshots/logs_backup?v


In the URL:
       - logs_backup: Name of the snapshot file
Time to sync up all the list of snapshots. If all our settings have been synced up just fine; we should end up with a list of indices, close to that of what is shown below:


Step4: Creating a Snapshot:

METHOD: PUT

URL: http://localhost:9200/_snapshot/logs_backup/type_of_the_backup?wait_for_completion=true

PAYLOAD:
            {
                "indices": "logstash-2017.11.21",
                "include_global_state": false,
                "compress": true,
                "encrypt": true
            }


In the URL:
       - logs_backup : Name of the snapshot file
       - type_of_the_backup : Could be any string
     
In the payload JSON:
        - indices: Correspond to the index which is to be backed-up to S3 bucket. In the case of multiple indices to back up under a single restoration point, the indices can be entered in the form of an array.
        - include_global_state: set to 'false' just to make sure there's cross-version compatibility. WARNING: If set to 'true', the index can be restored only to the ES of the source version.
        - compress: enables compression of the index meta files backed up to S3.
        - encrypt: In case if extra encryption on the indices is necessary.

This should give a response as '{"acknowledged": "true"}'

Step5: Restoring a Snapshot:

METHOD: PUT

URL: http://localhost:9200/_snapshot/name_of_the_backup/index_to_be_restored/_restore

PAYLOAD:
            {
                "ignore_unavailable": true,
                "include_global_state": false
            }

In the URL:
       - logs_backup: Name of the snapshot file
       - index_to_be_restored: Any of the index from the id listed in Step:3

In the payload JSON:
        - ignore_unavailable: It's safe to set this to true, to avoid unwanted checks.
        - include_global_state: set to 'false' just to make sure there's cross-version compatibility. WARNING: If set to 'true', the index can be restored only to the ES of the source version.

This should give a response as '{"acknowledged": "true"}'

Et Voila!  The restoration is complete.

And Don't forget to recycle the space corresponding to the index by safely deleting it - Reuse, Reduce & Recycle :)

Happy Wrangling!!!

Postgres to Mongo Migrator - Batteries Included!!!

DATABASE MIGRATION ACROSS PLATFORMS - Got your goosebumps yet?

     Well, long story short; cross-platform database migrations equals sleep talking, distress and long day works with coffee; and what good does it do? We will just end up writing hours and hours of scripts to conquer the end-result. However, It is of one-time-use-only, which lets you think to yourself; "All this horsepower and no room to gallop?".

Postgres to MongoDB:

    Be it a platform change, or maybe, it's due to the organizational growth or perhaps bad coding, or perhaps you have got your own microservices all set in, dwelling on the JSON objects; you might have had to switch from relational to noSQL databases. Switching can be tedious, I hear you and here lies the solution to all your worries.

Behold! Enter the Pg2Mongo:


 Pg2Mongo is an open source migration tool, written on pythonV3 which gives you an exclusive control over the migrations.

First Steps:

The initial step is to make sure you have access to both the Postgres and MongoDB servers. Upon cloning the repository, make sure you install the requirements for the pg2mongo to run.


For demonstration-sake, let's try to migrate the dataset provided along with the pg2mongo for us to play-around.

Configuration setup:

And now, all we got to do is to set up the instructions for the migrator to wrangle. The configuration file is at the location - 'pg2mongo/pg2mongo.yml' and it goes as follows:

The preliminary sections such as extraction and commit are self expanatory, stating the configuration settings for the extraction and commit databases. The component Migration is where all the magic happens!

The following section explains what the individual components are all about:

INIT_TABLE:

Inital table from which data needs to be migrated. This could be a prime table such as a transactions table with a primary key having multiple foreign constraints to other tables of the postgreSQL database. FOR EACH ENTRY IN THIS TABLE, THE LINKING OF OTHER TABLES WILL HAPPEN WHILE DEFINING THE TABLES.

INIT_KEYS:

KEYS of the init_table (aliases can be given using 'as')

SKELETON:

Skeleton is an empty raw python dictionary assignment which will transform to a mongodb document, upon migration

TABLES_ORDER:
 
The order by which the TABLES section needs to be executed for each of the entry from INIT_TABLE

TABLES:

Set of PostgreSQL tables enlisted along with condition and corresponding mapping. In the case of lists inside a dictionary, list can be mentioned. Mapping is where, the association of skeleton to the table keys is defined. The value assignments are python compatible; hence, they are defined by using '%s' and other python based variable transformation functions can be used over here.

COLLECTIONS:

This is where the push of the skeleton to the corresponding MongoDB collection takes place.
With all the instructions in place, it's time to wrangle. You may invoke the migration by keying in the following command.
And off she goes!!


Model Productionisation - MNIST Handwritten Digits Prediction


Yet another post about MNIST Handwritten Digits Prediction?

Nope. Not this time!!

There are about a hundred of tutorials available on-line for this cause.
Here's a quickie, to understand all the mechanics of the prediction process in tensorflow for the MNIST datasets which should get you, up and running.

Done with the basics? Head over to

https://github.com/datawrangl3r/mnistProduction

and clone the project.

We are about to deploy an image prediction RESTful API, powered by Flask microframework.

The code in the repo is written in pythonV2.7, you may also use python3; should be a breeze.


Step 2, mentioned above powers up the API, serving the end-point through the port 5000. Time to test-query our API.

The project directory contains the numerals_sample, from which one may crop the required digits out. As for this demo, we shall look at numba3.jpg, numba5.jpg, numba6.jpg, numba7.jpg and numba9.jpg present in the same directory, as that of the project.

Fire up the browser, and hit the following URL to test our model with a numba6.jpg:

http://localhost:5000/predictint?imageName=numba6.jpg


BAM..!!! I got a number 6!!


That was too easy.. How about - numba7.jpg


http://localhost:5000/predictint?imageName=numba7.jpg

BooM..!!!  7, It is...


How about, a numba9.jpg?


http://localhost:5000/predictint?imageName=numba9.jpg

I've got a 5 ??????????


Well, hate to admit.. There just can't be a 100% perfect model. Neither is our test datasets.

As a matter of fact; Five, does look a little bit like 9..


    Which drives us to the fact that, the model can be improved when  more and more training datasets are provided, which substantially increases the accuracy.

Key in your comments below, if you found this article to be helpful or just to give a shout-out!!!

Featured Posts

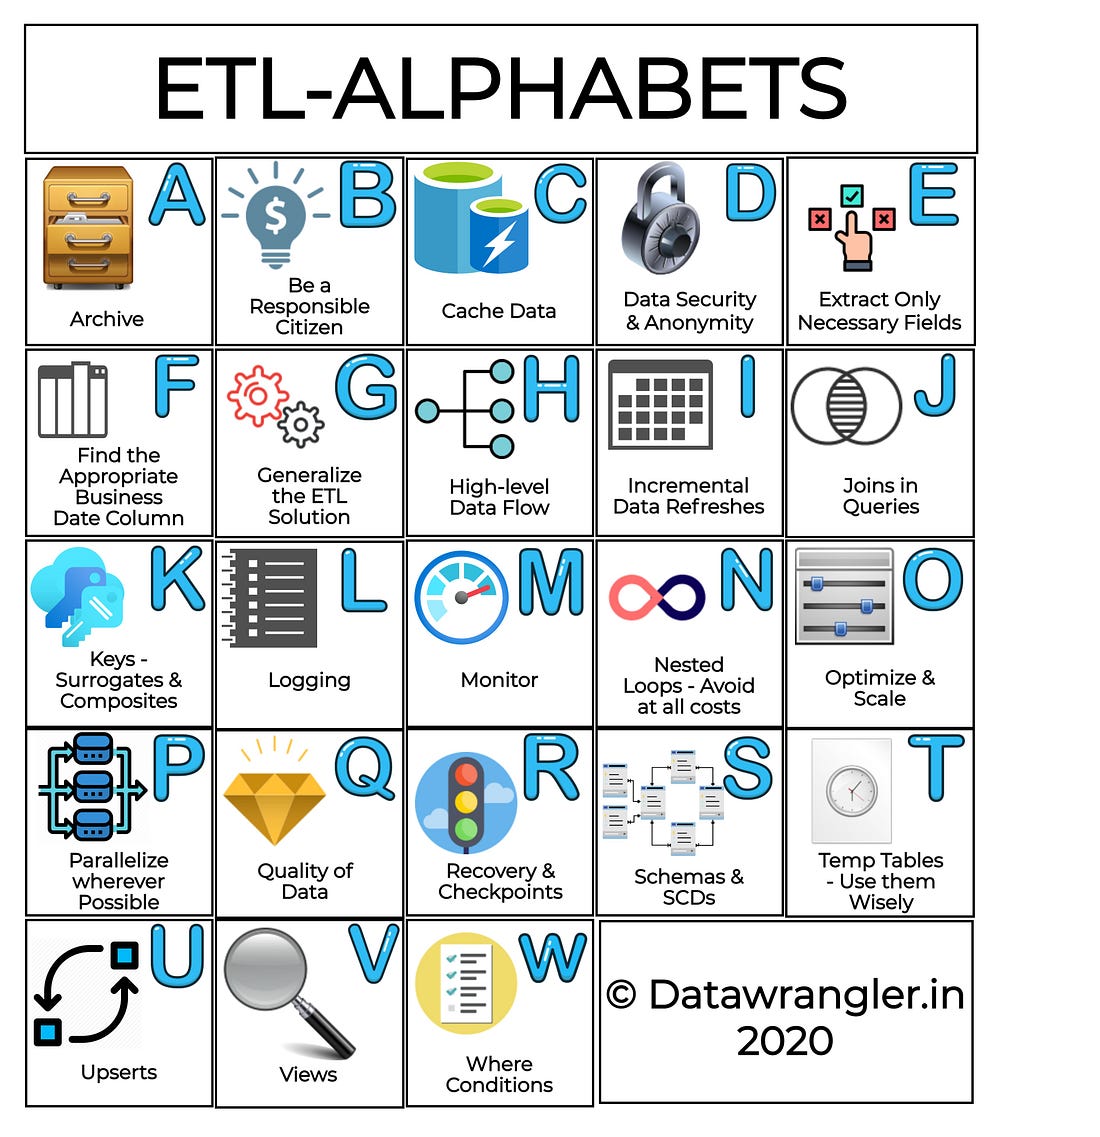
ETL & Enterprise Level Practices

  ETL Strategies & Pipelines have now become inevitable for cloud business needs. There are several ETL tools in the market ranging fro...